Hướng dẫn cấu hình WP Rocket với Nginx
Tổng quan
Nếu sử dụng WordPress, chắc hẳn bạn đã từng nghe đến hoặc từng sử dụng Plugin cache WP-Rocket, WP-Rocket là một trong những Plugin cache hàng đầu hiện nay. Việc cài đặt Plugin này lên các website sử dụng các máy chủ Apache, LiteSpeed Web Server (OpenLiteSpeed) sẽ cực kỳ đơn giản, vì các máy chủ này có hỗ trợ sẵn và các rule cấu hình sẽ được lưu trực tiếp thông qua file .htaccesss, nên bạn chỉ cần cài đặt vào là có thể sử dụng.
Tuy nhiên đổi với máy chủ sử dụng Nginx, thì việc thiết lập lại không đơn giản như vậy. Nếu muốn Plugin hoạt động tốt và tối ưu trên Nginx, thì sau khi cài đặt Plugin các bạn cần phải tạo file cấu hình wprocket.conf và khai báo file cấu hình này với cấu hình Nginx của website. Cụ thể các bước cấu hình ra sao, các bạn theo dõi các bước bên dưới nhé.
Các bước thực hiện
Bước 1: Tạo file cấu hình wprocket.conf.
Đầu tiên các bạn cần tạo file cấu hình wprocket.conf tại thư mục chứa mã nguồn của website. Ví dụ ở đây mình đang sử dụng VPS và cài đặt control aaPanel , website cần cài đặt là Partner VN.cf thì đường dẫn chứa mã nguồn website của mình sẽ là: /www/wwwroot/Partner VN.cf
Mình thực hiện di chuyển đến thư mục chứa mã nguồn và tạo file wprocket.conf như sau:
cd /www/wwwroot/Partner VN.cf
touch wprocket.conf
chown –R www:www wprocket.conf
vi wprocket.conf
Chú thích lệnh:
- Di chuyển đến thư mục chứa mã nguồn website.
- Tạo file wprocket.conf.
- Phân quyền người dùng cho file (thay www bằng user của bạn).
- Mở file và chỉnh sửa.
Mở được file wprocket.conf lên, bạn nhấn i hoặc INSERT để bắt đầu chỉnh sửa nội dung, bạn copy nội dung bên dưới và dán vào file wprocket.conf.
###################################################################################################
# Rocket-Nginx
#
# Rocket-Nginx is a NGINX configuration to speedup your WordPress
# website with the cache plugin WP-Rocket (http://wp-rocket.me)
#
# Author: Maxime Jobin
# URL: https://github.com/maximejobin/rocket-nginx
#
# Tested with WP-Rocket version: 2.8.11
# Tested with NGINX: 1.11.3 (mainline)
#
# Version 1.2
#
###################################################################################################

location / {
try_files $uri $uri/ /index.php?$args;
}

# Add debug information into header
set $rocket_debug 0;

# HTTP Strict Transport Security (to overwrite default)
set $rocket_hsts_value "";

# WP-Content directory (leave as is if you did not alter WordPress' default value)
set $rocket_wpcontent_directory "$document_root/wp-content";

# WP-Content URL (leave as is if you did not alter WordPress' default value)
set $rocket_wpcontent_url "/wp-content";

###################################################################################################
# Do not alter theses values
#
set $rocket_bypass 1;                # Should NGINX bypass WordPress and call cache file directly ?
set $rocket_encryption "";            # Is GZIP accepted by client ?
set $rocket_file "";                # Filename to use
set $rocket_is_bypassed "No";        # Header text added to check if the bypass worked or not. Header: X-Rocket-Nginx-Bypass
set $rocket_reason "";                # Reason why cache file was not used. If cache file is used, what file was used
set $rocket_https_prefix "";        # HTTPS prefix to use when cached files are using HTTPS
set $rocket_hsts 0;                    # Is HSTS is off (0) by default. Will be turned on (1) if request is HTTPS

# HSTS Default value : 1 year,include subdomains.
set $rocket_hsts_value_default "max-age=31536000; includeSubDomains";

###################################################################################################
# PAGE CACHE

# Is GZIP accepted by client ?
if ($http_accept_encoding ~ gzip) {
    set $rocket_encryption "_gzip";
}

# Is SSL request ?
if ($https = "on") {
    set $rocket_https_prefix "-https";
    set $rocket_hsts 1;
}

# If HSTS value is not set, use default value
if ($rocket_hsts_value = "") {
    set $rocket_hsts_value "$rocket_hsts_value_default";
}

# If HSTS is disabled, unset HSTS set for Rocket-Nginx configuration
if ($rocket_hsts = "0") {
    set $rocket_hsts_value "";
}

# File/URL to return IF we must bypass WordPress
# index-mobile.html
# index-mobile-https.html
set $rocket_end "/cache/wp-rocket/$http_host/$request_uri/index$rocket_https_prefix.html$rocket_encryption";
set $rocket_url "$rocket_wpcontent_url$rocket_end";
set $rocket_file "$rocket_wpcontent_directory$rocket_end";
set $rocket_mobile_detection "$rocket_wpcontent_directory/cache/wp-rocket/$http_host/$request_uri/.mobile-active";

# Do not bypass if it's a POST request
if ($request_method = POST) {
    set $rocket_bypass 0;
    set $rocket_reason "POST request";
}

# Do not bypass if arguments are found (e.g. ?page=2)
if ($is_args) {
    set $rocket_bypass 0;
    set $rocket_reason "Arguments found";
}

# Do not bypass if the site is in maintenance mode
if (-f "$document_root/.maintenance") {
    set $rocket_bypass 0;
    set $rocket_reason "Maintenance mode";
}

# Do not bypass if one of those cookie if found
# wordpress_logged_in_[hash] : When a user is logged in, this cookie is created (we'd rather let WP-Rocket handle that)
# wp-postpass_[hash] : When a protected post requires a password, this cookie is created.
if ($http_cookie ~* "(wordpress_logged_in_|wp-postpass_|woocommerce_items_in_cart|woocommerce_cart_hash|wptouch_switch_toogle|comment_author_|comment_author_email_)") {
    set $rocket_bypass 0;
    set $rocket_reason "Cookie";
}

if (-f "$rocket_mobile_detection") {
    set $rocket_bypass 0;
    set $rocket_reason "Specific mobile cache activated";
}

# Do not bypass if the cached file does not exist
if (!-f "$rocket_file") {
    set $rocket_bypass 0;
    set $rocket_reason "File not cached";
}

# If the bypass token is still on, let's bypass WordPress with the cached URL
if ($rocket_bypass = 1) {
    set $rocket_is_bypassed "Yes";
    set $rocket_reason "$rocket_url";
}

# Clear variables if debug is not needed
if ($rocket_debug = 0) {
    set $rocket_reason "";
    set $rocket_file "";
}

# If the bypass token is still on, rewrite according to the file linked to the request
if ($rocket_bypass = 1) {
    rewrite .* "$rocket_url" last;
}

# Add header to HTML cached files
location ~ /wp-content/cache/wp-rocket/.*html$ {
    add_header Vary "Accept-Encoding, Cookie";
    add_header X-Rocket-Nginx-Bypass $rocket_is_bypassed;
    add_header X-Rocket-Nginx-Reason $rocket_reason;
    add_header X-Rocket-Nginx-File $rocket_file;
    #add_header Strict-Transport-Security "$rocket_hsts_value";
    expires 30d;

    #!# HEADER_HTTP #!#
    #!# HEADER_NON_GZIP #!#
}

# Do not gzip cached files that are already gzipped
location ~ /wp-content/cache/wp-rocket/.*_gzip$ {
    gzip off;
    types {}
    default_type text/html;
    add_header Content-Encoding gzip;
    add_header Vary "Accept-Encoding, Cookie";
    add_header X-Rocket-Nginx-Bypass $rocket_is_bypassed;
    add_header X-Rocket-Nginx-Reason $rocket_reason;
    add_header X-Rocket-Nginx-File $rocket_file;
    #add_header Strict-Transport-Security "$rocket_hsts_value";
    expires 30d;

    #!# HEADER_HTTP #!#
    #!# HEADER_GZIP #!#
}

# Debug header (when file is not cached)
add_header X-Rocket-Nginx-Bypass $rocket_is_bypassed;
add_header X-Rocket-Nginx-Reason $rocket_reason;
add_header X-Rocket-Nginx-File $rocket_file;

# No HSTS header added here. We suppose it's correctly added in the site configuration

##################################################################################################
# BROWSER CSS CACHE
#
location ~* .css$ {
    gzip_vary on;
    expires 30d;


    #!# HEADER_CSS #!#
}

###################################################################################################
# BROWSER JS CACHE
#
location ~* .js$ {
    gzip_vary on;
    expires 30d;

    #!# HEADER_JS #!#
}

###################################################################################################
# BROWSER MEDIA CACHE
#
location ~* .(ico|gif|jpe?g|png|svg|eot|otf|woff|woff2|ttf|ogg)$ {
    expires 30d;

    #!# HEADER_MEDIAS #!#
}
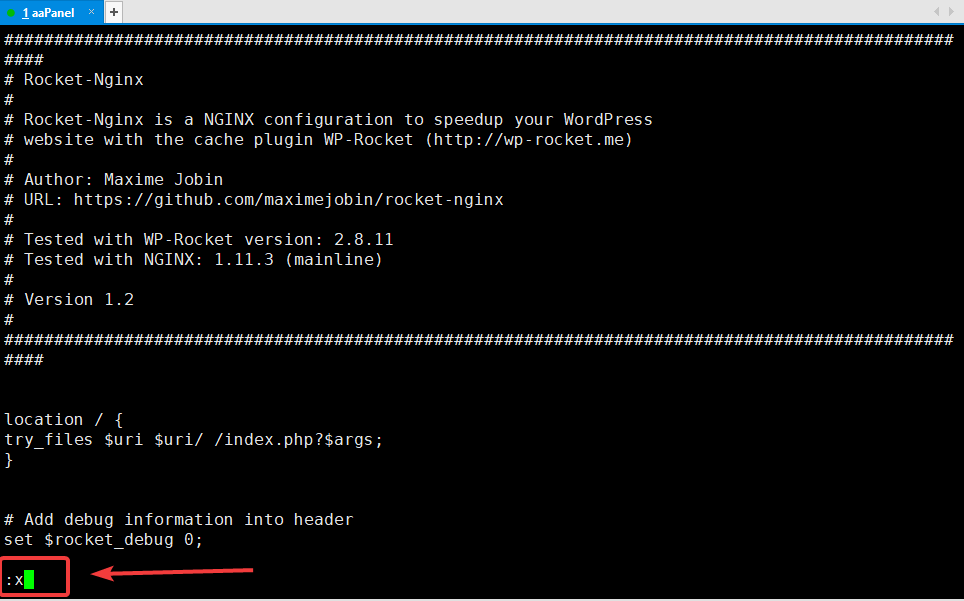
Hoàn tất bạn nhấn ESC để thoát khỏi trình chỉnh sửa , tiếp tục nhấn :x để lưu lại nội dung và thoát ra màn hình chính.
Bước 2: Xác định vị trí file cấu hình nginx của website.
Để xác định được file cấu hình nginx của website, bạn có thể xác định nhanh thông qua file cấu hình nginx của VPS.
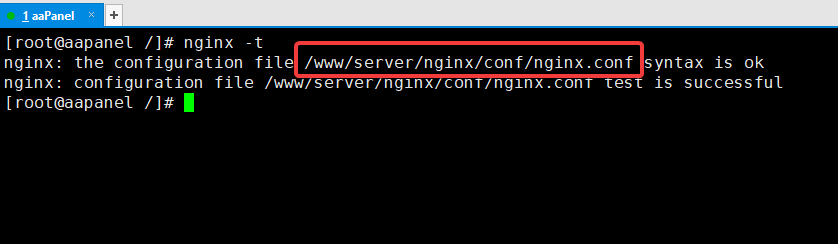
Bạn gõ lệnh nginx –t để kiểm tra hoạt động và đường dẫn của Nginx, lúc này hệ thống sẽ hiển thị ra đường dẫn file cấu hình Nginx của VPS (bạn để ý phần mình khoanh đỏ)
Lưu ý: Mỗi Control panel khi cài đặt sẽ có một đường dẫn Nginx khác nhau, nên bạn cần để ý và sử dụng chính xác đường dẫn hiển thị ở VPS của mình và làm chính xác nhé.
Bạn tiến hành mở file nginx.conf được hiển thị bằng cách sử dụng lệnh bên dưới:
vi /www/server/nginx/conf/nginx.conf
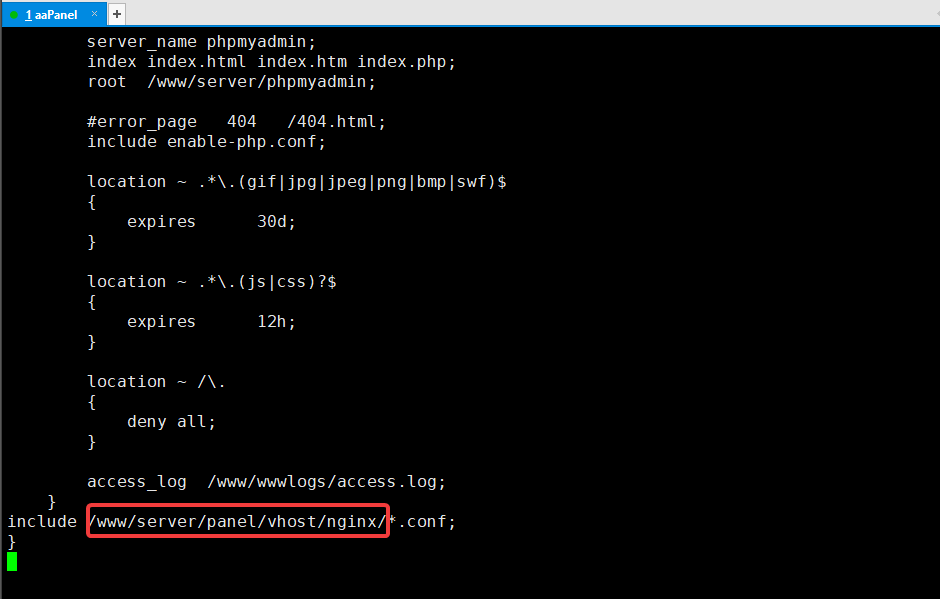
Bạn tìm đến dòng có chữ include (phần mình khoanh đỏ), đây sẽ là được dẫn chứa file cấu hình Nginx của các website trên VPS.
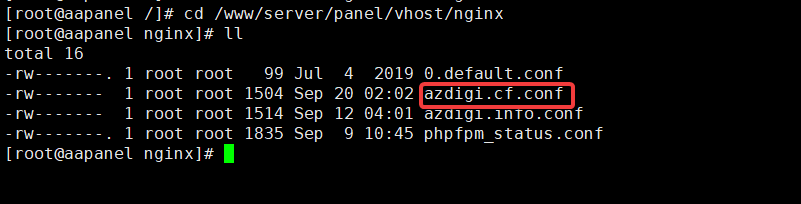
Bạn thoát ra và di chuyển đến đường dẫn cấu hình nginx của website bằng lệnh:
cd /www/server/panel/vhost/nginx
Sử dụng lệnh ll để liệt kê các file cấu hình, ở đây mình đang cấu hình cho website Partner VN.cf thì file cần chỉnh sửa sẽ là Partner VN.cf.conf.
Bước 3: Khai báo đường dẫn file wprocket.conf với cấu hình Nginx của website.
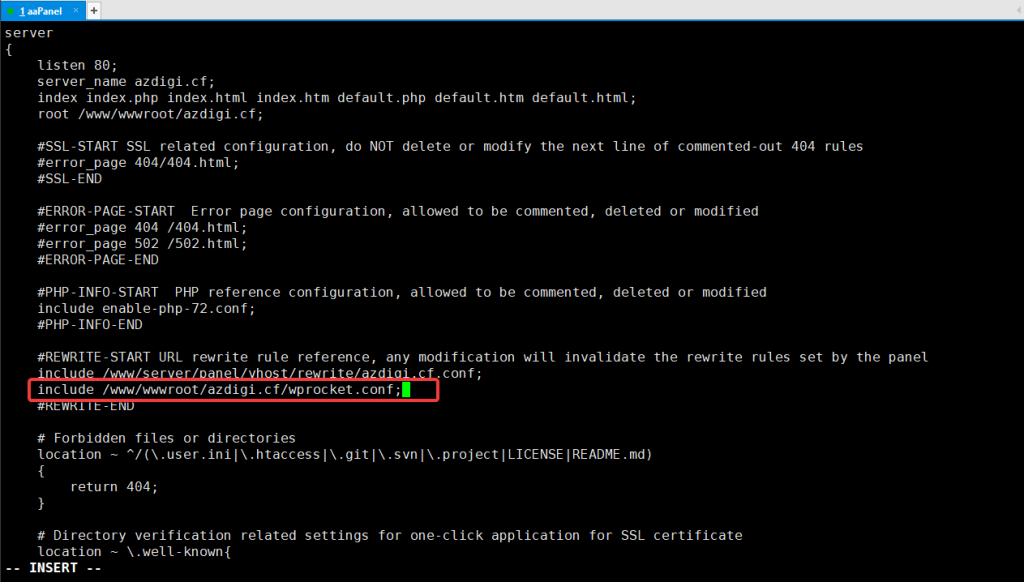
Sau khi đã xác định được đường dẫn file cấu hình nginx của website (ở bước 2), bạn tiến hành mở file lên và thực hiện chỉnh sửa theo lệnh bên dưới:
vi Partner VN.cf.conf
include /www/wwwroot/Partner VN.cf/wprocket.conf
Chú thích lệnh:
- Mở file cấu hình nginx website
- Khai báo đường dẫn file wprocket.conf (đã tạo ở bước 1)
Hoàn tất bạn nhấn ESC để thoát khỏi trình chỉnh sửa , tiếp tục nhấn :x để lưu lại nội dung và thoát ra màn hình chính.
Bây giờ bạn kiểm tra lại hoạt động của nginx bằng lệnh nginx –t , nếu nhận được thông báo test is successful là thành công.
Bước 4: Kiểm tra website
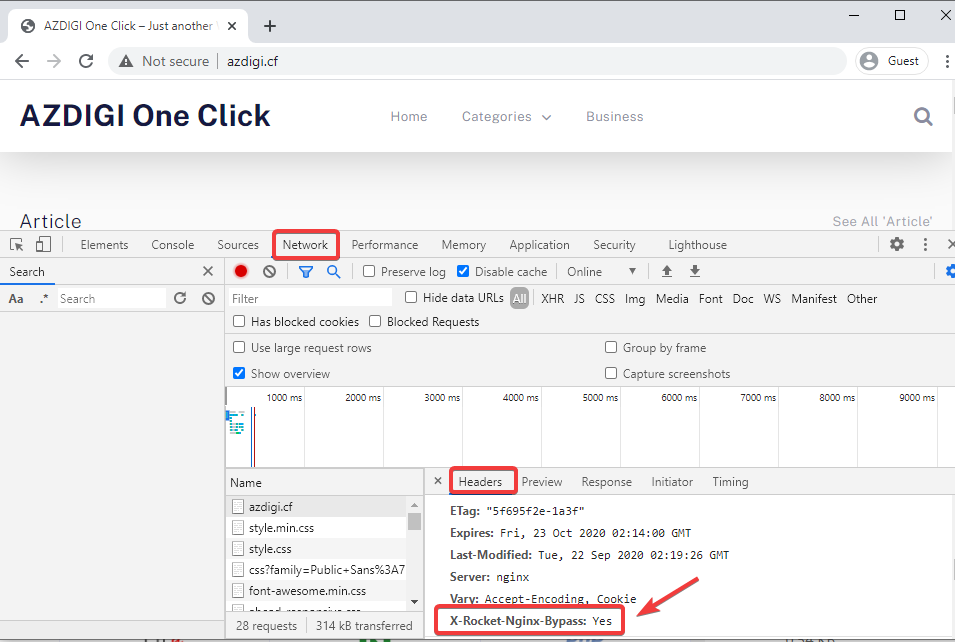
Bạn truy cập vào trang quản trị website, vào Plugin WP-Rocket thực hiện Clear cache và Preaload lại cache.
Tiếp đó bạn truy cập website và nhấn F12 , chọn tab Network => Headers để kiểm tra => bạn để ý dòng X-Rocket-Nginx-Bypass: Yes là đã cấu hình thành công rồi nhé.
Tổng kết
Như vậy ở bài viết này Partner VN đã hướng dẫn bạn cách cấu hình WP-Rocket với nginx một cách chi tiết và đơn giản nhất. Việc cấu hình này giúp Plugin WP-Rocket hoạt động tốt và tối ưu nhất trên các máy chủ sử dụng Nginx. Nếu thấy bài viết hữu ích bạn có thể chia sẻ rộng rãi đến mọi người nhé.
Bạn có thể tham khảo một số bài viết hữu ích về aaPanel bên dưới
- Hướng dẫn sử dụng aaPanel.
Chúc các bạn thực hiện thành công.!
Nếu các bạn cần hỗ trợ các bạn có thể liên hệ bộ phận hỗ trợ theo các cách bên dưới:
- Hotline: 0569 395 495
- Email: support@partner.com.vn